UV DTF transfer is redefining garment printing by pairing a film-based design with the speed of UV-curable inks. By combining DTF printing concepts with direct-to-film applications, this approach delivers sharp color and quick curing that suits on-demand apparel. UV printing on a special transfer film creates a durable image that can be bonded to cotton, blends, and more, making UV DTF transfer an appealing option for crafters and small brands. From setup to final cure, the UV DTF process emphasizes speed, reduced post-processing, and reliable adhesion, helping you scale your garment printing projects. Whether you’re just starting out or expanding a catalog, UV DTF transfer offers a versatile path to vibrant, long-lasting designs.
From a terminology standpoint, many designers describe this as an ultraviolet-curable film transfer for textiles, a modern take on garment decoration. In practice it uses UV-curable inks on a transparent carrier to create a design that bonds to fabric through heat and pressure, often called direct-to-film or UV film decoration. Other descriptors emphasize speed, film-based decoupled transfers, and vibrant color fidelity, appealing to on-demand garment printing and small-batch runs. Viewed through an LSI lens, phrases such as digital textile transfer, UV-curable film print, and UV-print on film all point to the same core technique used in garment printing.
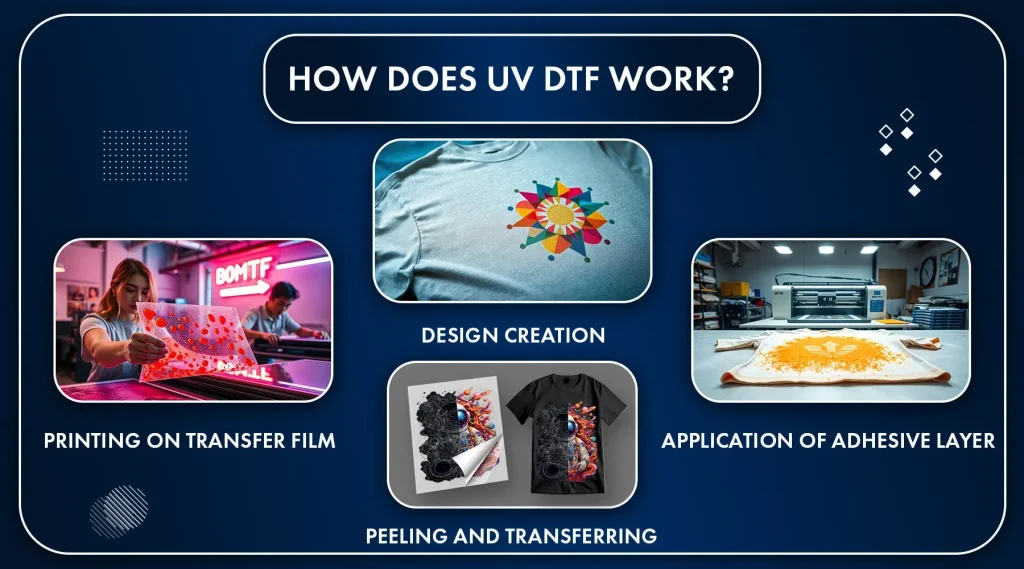
Understanding UV DTF transfer: A Primer for Garment Printing
UV DTF transfer is a garment decoration method that uses UV-curable inks printed onto a transfer film to create a design that can be bonded to fabric with heat and pressure. It blends the advantages of direct-to-film workflows with the durability and fast curing of UV inks, making it a practical option for garment printing projects from small studios to micro-brands.
In the UV DTF process, designs are prepared in software, printed onto transfer film using UV-curable inks, cured with UV exposure, and then bonded to the garment with a heat press. This approach reduces post-processing steps compared with traditional DTF printing and can help speed up production while preserving color fidelity and edge definition for garment printing.
Comparing UV DTF transfer with Traditional DTF and UV Printing
Compared with standard DTF printing, UV DTF transfer often eliminates the need for adhesive powders because the ink cures and adheres under heat. The film-based transfer remains easy to handle, preserving the benefits of direct-to-film workflows within garment printing.
UV printing, when applied directly to substrates, behaves differently than a UV DTF transfer that is applied to fabric. In garment printing, the film provides control over sizing, edging, and color density while leveraging the rapid cure and color stability of UV inks for sharp, vibrant results.
Materials and Equipment You Need for UV DTF Process
Key tools to run the UV DTF process include a UV-curable ink printer or a DTF printer with UV capability, a transfer film compatible with UV inks, a UV curing light source, and a heat press. You will also rely on design software and color management tools to maintain consistent output for garment printing projects.
Optional items such as an adhesive bonding layer, carrier paper, protective sheets, scissors, tape, and lint rollers support a smoother workflow. Availability and compatibility of supplies can influence how you set up a shop for garment printing using direct-to-film methods.
Step-by-Step Guide to UV DTF Transfers on Garments
Step 1: Create and prepare your design in your preferred software, ensuring the color profile, resolution, and final garment size align with the transfer area. Step 2: Print onto the UV transfer film using UV-curable inks, keeping an even ink layer and avoiding smearing. Step 3: Cure the printed film with a UV light source to lock in colors and prevent smudging.
Step 4: Pre-press the garment to remove moisture and create a flat surface. Step 5: Align the transfer carefully on the garment. Step 6: Apply heat and pressure with a heat press, following the ink and fabric guidelines for temperature and time. Step 7: Peel the transfer using hot, warm, or cold peel according to the film’s recommendations, then Step 8: optionally perform a post-press cure for enhanced durability.
Troubleshooting Common Issues in UV DTF Printing
Misregistration is a common issue that happens when the transfer shifts during printing or pressing. Calibrate your alignment marks, use test runs on similar fabrics, and verify the setup before full runs to minimize misregistration in garment printing and DTF workflows.
Color shifts can occur as UV inks interact with fabric color and texture. Conduct color tests, adjust profiles, and rely on test prints to maintain robust color fidelity. Adhesion problems may surface if pre-press time or temperature are off, or if the bonding layer is incompatible with the fabric.
Design Tips and Best Practices for Quality Garment Printing with UV DTF
Design for UV DTF transfer by using clean vector lines for crisp edges and high-resolution raster elements for detailed areas. Monitor color density and keep a storyboard of swatches to anticipate how designs translate to the transfer film in the context of garment printing and DTF printing.
Develop a repeatable workflow that documents temperatures, times, film types, and curing settings. Calibrate printers regularly and run small fabric tests to validate wash durability and finish on cotton, blends, and other fabrics commonly used in garment printing. Safety and ventilation should accompany your testing routine.
Frequently Asked Questions
What is UV DTF transfer and how does it differ from DTF printing?
UV DTF transfer uses UV-curable inks printed onto a transfer film and cured with UV light, creating a design ready for garment printing. Unlike traditional DTF printing with water-based inks and powder adhesion, UV DTF often requires less post-processing and enables a quicker cure, delivering sharp, vibrant results on fabrics.
Is the UV DTF process suitable for cotton and blends in garment printing?
Yes—UV DTF transfer works on cotton, blends, and many other fabrics. It delivers bright color and durability, but it’s wise to test on each fabric type to optimize cure times, adhesion, and overall feel in garment printing.
What equipment do I need to start with UV DTF transfer?
To begin with UV DTF transfer, you’ll typically need a UV-curable ink printer or a DTF printer with UV capability, UV-compatible transfer film, a UV curing light, a heat press, design software, and alignment tools. This setup aligns with the direct-to-film approach used in UV DTF processes.
What are common issues with UV DTF transfers and how can I troubleshoot them?
Common issues include misregistration, color shifts, improper adhesion, and ghosting. Troubleshoot by calibrating color profiles for UV inks, ensuring proper pre-press and curing, checking film compatibility, and confirming correct heat and pressure settings for your fabric.
How durable are UV DTF transfers on garments compared with traditional methods?
When properly cured and bonded, UV DTF transfers can be highly durable and wash-fast, often matching or exceeding durability of some traditional DTF or sublimation results. Durability depends on fabric type, cure quality, and the transfer film used.
Can you outline the typical workflow from design to finishing a UV DTF transfer?
Design your artwork, then print it onto a UV transfer film using UV inks. Cure the printed film, pre-press the garment, align the transfer, apply heat and pressure, peel the film (hot/warm/cold as recommended), and perform a post-press cure if advised for your materials.
| Aspect},{ | |
|---|---|
| What is UV DTF transfer? | UV-curable inks printed on a transfer film bonded to fabric with heat and pressure; inks cure quickly under ultraviolet light, delivering sharp color, high durability, and potentially faster production times. |
| How UV DTF transfer works (overview) | Design artwork, print onto UV transfer film with UV inks, cure the film with UV light, (optional) apply an adhesive layer, pre-press the garment, align and press, peel the film, and finish. |
| Materials needed | UV-curable ink printer or UV-capable DTF printer; UV transfer film; UV curing light source; heat press; design software; optional adhesive/bonding layer; carrier paper or protective sheets; basic tools (scissors, tape, lint roller). |
| Step-by-step process (highlights) | 1) Create and prepare design; 2) Print onto transfer film; 3) Cure the printed film; 4) Pre-press garment; 5) Align transfer; 6) Apply heat and pressure; 7) Peel; 8) Post-press finishing. |
| Benefits | Bright color reproduction; durability and wash resistance; versatility across fabrics; potential for streamlined workflow for shops with UV curing equipment. |
| Limitations and considerations | Higher upfront costs for equipment and supplies; color management can be complex; durability can vary by fabric and curing; availability of compatible films/lamps may vary by region. |
| Common issues & troubleshooting | Misregistration, color shifts, poor adhesion, ghosting, fabric scorching. Solutions: ensure alignment marks, calibrate color profiles, confirm proper curing, verify adhesive compatibility, and test on representative fabrics. |
| Safety considerations | Follow ink MSDS and equipment manuals; ensure ventilation; wear protective eyewear and gloves; avoid direct UV exposure; keep lamps away from children/pets. |
Summary
UV DTF transfer is a compelling option for beginners and experienced printers seeking a modern approach to garment decoration. By combining the flexibility of transfer films with the rapid curing of UV inks, UV DTF transfers can deliver vivid, durable designs on a wide range of fabrics. Understanding the materials, workflow, and safe operating procedures helps optimize results and production efficiency. Whether you’re exploring on-demand apparel or small-batch runs, UV DTF transfer offers a versatile path to high-quality prints with a streamlined process.

