UV DTF transfer combines the precision of UV-curable inks with the direct-to-film workflow to deliver vibrant, durable designs on textiles, making it a popular choice for artists and small businesses alike as they seek reliable, scalable decoration options in a fast-changing market. If you’re evaluating methods for apparel decoration, this guide walks you through planning, printing, heat pressing, post-curing, and care to help you achieve professional results that last wash after wash and withstand daily wear, while offering practical tips that reduce trial-and-error experimentation. You’ll learn how this UV-based process emphasizes sharp details, saturated color, and colorfast performance on a range of fabrics, including cotton, blends, and synthetics, while also comparing it to other transfer options for context, scalability, and long-term cost considerations. We also cover the essentials of choosing compatible materials, setting up a workflow that minimizes error, and applying consistent heat and pressure to ensure even adhesion and long-term durability, especially when comparing scenarios and balancing print quality with production speed. With patience and careful testing, you can expand your customization options for apparel, bags, and home textiles while building confidence to scale projects from hobby experiments into small-batch productions that meet growing demand.
Viewed through an LSI lens, this approach can be described as an ink-on-film technique that uses UV-curable inks on a transfer film, then bonds the design to fabric with heat and pressure. In practical terms, many professionals categorize it alongside UV printing on fabric, the broader field of digital textile printing, and, for comparison, the traditional DTF transfer workflow. If you’re looking for a quick guide on process specifics, you might search for a how to do UV DTF transfer resource or a DTF transfer tutorial to learn setup, curing, and post-care nuances. The choice between DTF and UV-backed transfers often comes down to fabric compatibility, wash durability, and the level of detail required by your artwork, with each path offering distinct advantages. As you gather information from multiple sources, use terms like DTF vs UV transfer to compare performance and cost, ensuring you align technical specifics with your production goals.
Understanding UV DTF Transfer: What It Is and Why It Shines
UV DTF transfer blends the precision of UV-curable inks with the flexible DTF workflow, enabling vibrant designs on textiles with sharp detail. By printing to a transfer film using UV ink and then transferring with heat, you leverage fast curing and excellent edge definition, especially on non-standard fabrics. This approach sits at the intersection of UV printing on fabric and traditional DTF, making it a versatile option for apparel and accessories.
Understanding the core differences between UV DTF transfer and standard DTF transfer helps you plan projects more effectively. Consider color endurance, white underbase needs, fabric texture, and wash performance as you compare DTF transfer vs UV transfer. With the right setup, you can achieve professional results that rival storefront prints while maintaining flexibility for small runs and custom designs.
DTF Transfer vs UV Transfer: Choosing the Right Path for Your Project
DTF transfer vs UV transfer decision-making hinges on substrate compatibility, detail resolution, and production speed. DTF transfer generally delivers strong color brilliancy across many fabrics, while UV transfer can sharpen fine lines and reduce curing time on compatible substrates. This is a practical distinction when you’re evaluating a DTF transfer tutorial or planning a small-batch line.
To choose wisely, test on representative fabrics and designs. Consider whether the project benefits from the tactile feel of a traditional transfer or the crispness of a UV-cured print. A few controlled tests comparing UV printing on fabric against standard DTF will clarify performance, helping you decide whether to lean into UV DTF transfer or stick with classic DTF.
UV Printing on Fabric: Materials, Setup, and Substrate Compatibility
Setting up for UV printing on fabric starts with selecting compatible materials: UV-curable inks, a DTF transfer film designed for UV inks, and an adhesive powder that aligns with your printer. This combination supports strong adhesion after heat pressing and helps preserve color accuracy across steps in the workflow. Proper setup reduces ink bleed and ensures consistent results on cotton, blends, or polyester fabrics.
Substrate choice matters for durability and feel. Cotton blends and poly-cotton fabrics respond well to UV printing on fabric when combined with the DTF transfer process, while some synthetics may require adjustments to curing times and pressure. Calibrate your printer color management, and plan for post-transfer testing to confirm wash resistance and color fidelity.
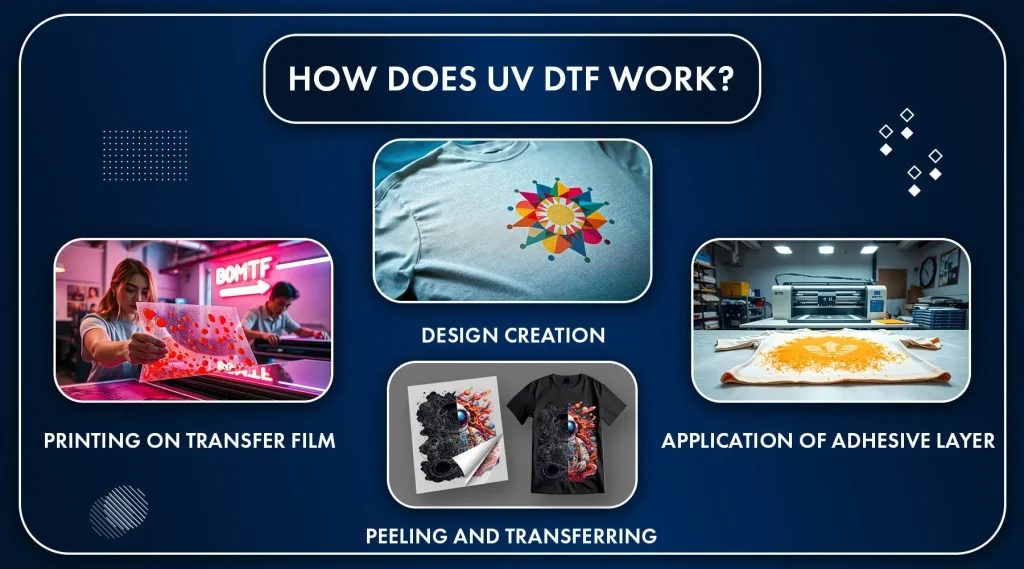
How to Do UV DTF Transfer: A Beginner-Friendly Step-by-Step Tutorial
How to Do UV DTF Transfer starts with design and file prep. Create artwork with sharp edges, set safe margins, and export at high resolution (300 dpi or more). If white areas are part of the design, plan the white layer so brightness remains evident after transfer. This is a critical step often covered in a DTF transfer tutorial and lays the groundwork for a successful result.
Next, print to the transfer film using your UV setup, apply adhesive powder, and cure according to your product guidelines. The heat-press phase follows, with even pressure and appropriate temperature. When you finish, peel according to hot- or cold-peel recommendations. This sequence—design, print, powder, cure, press—embodies how to do UV DTF transfer with reliable outcomes.
DTF Transfer Tutorial Essentials: From Design to Durable Finish
DTF Transfer Tutorial Essentials: From Design to Durable Finish. Start with clean artwork and consistent color profiles, ensuring the design is sized for the transfer film. Use 300 dpi or higher to prevent pixelation, and create safe margins to avoid edge bleed during transfer. Following these fundamentals helps translate your digital design into a high-quality physical print.
Proceed to printing, powder application, curing, and heat pressing, paying attention to uniform temperature and pressure. Validate your results with a quick post-transfer test on the same fabric type and adjust ink density or curing time as needed. A disciplined DTF transfer tutorial approach reduces surprises and improves repeatability for future runs.
Care, Troubleshooting, and Longevity for UV DTF Designs
Care, Troubleshooting, and Longevity for UV DTF Designs. Common issues include misalignment, color dulling, or incomplete adhesion. Comb through your workflow to identify where ink density, film compatibility, or curing time may be affecting results, and run targeted tests to isolate the cause. Keeping a log of temperatures, times, and fabric types supports ongoing improvement in UV DTF projects.
Post-transfer care drives long-term durability. Provide washing instructions, gentle cycles, and air drying when feasible to maintain vibrancy. Proper curing and consistent heat-press settings help sustain the print through wear, and comparing UV DTF output with traditional DTF or UV printing on fabric in real-world use will guide future optimization for your audience.
Frequently Asked Questions
What is UV DTF transfer and how does it differ from DTF transfer?
UV DTF transfer uses UV-curable inks printed onto a DTF transfer film, which is cured with ultraviolet light and then heat pressed onto fabric. Compared with standard DTF transfer, UV DTF transfer can deliver sharper details and faster curing on select fabrics, though results vary by material and inks. In practice, you follow the same overall workflow: design, print to film, apply adhesive powder, cure, and heat press.
How to do UV DTF transfer and what are the essential steps?
To do UV DTF transfer, follow a clear sequence: design your artwork at high resolution, print to the UV transfer film with UV-curable inks, apply adhesive powder, cure the film, prepare the garment, heat-press the transfer with even pressure and the recommended time, then peel and set the film and complete post‑press care.
What materials do I need for UV DTF transfer, and how does UV printing on fabric fit into the setup?
You’ll need UV printing equipment or UV-curable inks, DTF transfer film and adhesive powder, a reliable heat press, a clean workspace, PPE, and design software. This setup enables UV printing on fabric while using the DTF transfer workflow to apply designs with durable adhesion.
Is UV DTF transfer suitable for white or dark fabrics, and how does this relate to DTF transfer and UV printing on fabric?
UV DTF transfer can work on both white and dark fabrics, but color handling and underbase requirements vary. For vibrant results on dark fabrics, an appropriate underbase and color management are often needed. This ties into both traditional DTF transfer considerations and UV printing on fabric when choosing the best method for a given garment.
What are common troubleshooting steps in a UV DTF transfer (DTF transfer tutorial tips)?
Common issues include misalignment, dull colors, white underbase not appearing, and powder not sticking. Use alignment marks and secure positioning, adjust ink density and curing time for color fidelity, verify white underbase printing and curing, and ensure the adhesive powder type and application are correct. Following these DTF transfer tutorial tips helps improve yield.
How durable is a UV DTF transfer compared to conventional DTF transfer, i.e. DTF vs UV transfer?
Durability depends on fabric type, curing quality, and care. UV DTF transfer can offer strong adhesion and good color fastness on some textiles, with faster curing times, but performance varies by substrate and inks. When deciding between DTF vs UV transfer, run test pieces on your typical fabrics and follow manufacturer care instructions to maximize longevity.
| Topic | Key Points |
|---|---|
| What is UV DTF transfer | A method that uses UV-curable inks printed onto a transfer film, cured quickly under UV light, and bonded to fabric with heat and pressure. When paired with the DTF workflow, it enables sharp details and color endurance on textiles, offering a relatively simple design-to-press process. It’s useful to compare with standard DTF to decide which approach fits your project. |
| Why it matters | Delivers vibrant, durable designs with potentially faster curing. Expands customization options for apparel, bags, and other textiles. Can provide sharper details on certain substrates compared to some traditional methods. |
| Before you begin: essentials | UV-curable inks or access to UV-printing capability; DTF transfer film and adhesive powder; a reliable heat press; a clean, organized workspace; design files exported at high resolution (≥300 dpi). |
| Materials and setup | Materials compatible with UV inks (printing surface, transfer film, adhesive powder designed for DTF). Works across fabrics such as cotton, blends, and polyester. Consider wash durability and substrate compatibility when choosing options. |
| Step-by-step overview | Design and file prep -> printer setup and color management -> print to transfer film -> apply adhesive powder -> cure the film -> prepare the garment -> heat-press -> peel and set -> post-press care. |
| Troubleshooting | Misalignment: use alignment marks and a grid. Faded colors: adjust ink density and curing time. White underbase not appearing: verify white layer printing/cure. Powder not sticking: check powder type/amount and ensure proper print layering. |
| DTF transfer vs UV transfer | DTF can excel across many fabrics with vibrant colors; UV DTF transfer may offer sharper details and faster curing on select substrates. Choose based on wash durability, fabric texture, and required detail; run small tests to compare results. |
| Tips for best results | Design with safe margins; use high-resolution artwork (≥300 dpi); run test prints on the same fabric; maintain consistent heat and pressure; follow safety and curing guidelines for UV inks and powders. |
| Care and longevity | Follow manufacturer care instructions. Proper curing and washing guidelines help extend the life of a UV DTF transfer. |
Summary
UV DTF transfer opens up exciting possibilities for vibrant, durable textile designs. By understanding the core concepts, assembling the right materials, and following a step-by-step process, you can produce professional results that stand up to washing and daily wear. The keys are careful preparation, precise heat pressing, and thoughtful post-care guidance. As you gain experience with UV DTF transfer and compare it to other methods like traditional DTF or UV printing on fabric, you’ll discover best practices tailored to your substrates and audience. Remember, practice, test runs, and meticulous attention to detail are your friends on this journey toward consistent, high-quality UV-based transfers.

