DTF design pitfalls can determine the final look of a transfer long before the shirt leaves the press. Direct-to-film transfers promise bold colors and a soft hand, but the final result hinges on prepress decisions and design setup. As you plan, consider how artwork behaves when translated through the DTF printing process, how color is managed, and how layers stack during heat pressing. This guide highlights seven common DTF garment printing mistakes to avoid and offers practical DTF print design tips to improve consistency. Following solid DTF design guidelines and color management practices helps ensure durable, vibrant transfers across orders.
Beyond the phrasing of DTF design pitfalls, think in terms of film-transfer design missteps and artwork translation challenges. Framing the issue as prepress optimization for fabric prints helps teams focus on color management, underbase decisions, and layer order before any press is engaged. From an LSI perspective, phrases like DTF transfer troubleshooting surface when addressing test prints, calibration, and batch-to-batch consistency. Using a checklist built around these related terms—prepress readiness, bleed, safe area, and alignment—streamlines workflows and reduces costly retakes. Adopting a language that mirrors how fabrics respond to ink helps teams communicate clearer expectations and deliver reliable finishes across garments.
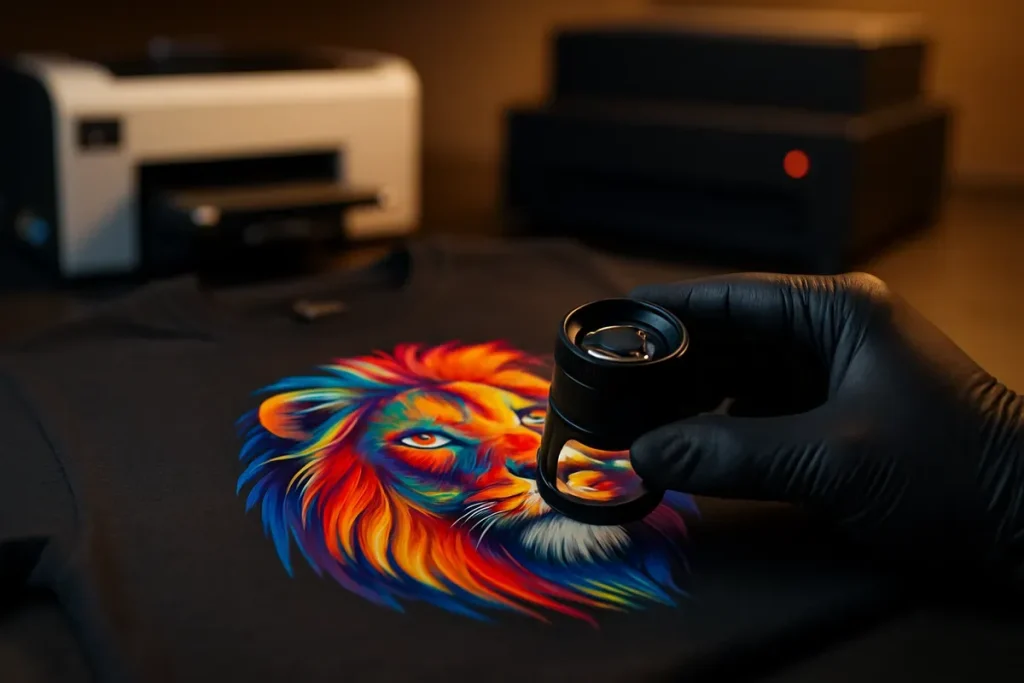
DTF Design Pitfalls to Avoid in Direct-to-Film Transfers
DTF design pitfalls can derail a project long before the first garment leaves the press. To maximize success with direct-to-film transfers, align artwork with DTF design guidelines from the outset, focusing on color management, underbase planning, and layer sequencing. When you anticipate how artwork behaves during the print-to-transfer journey, you reduce waste and set a solid foundation for vibrant, durable results. This approach also supports better DTF transfer troubleshooting because you’re solving potential issues at the setup stage rather than mid-production.
A core part of avoiding DTF design pitfalls is recognizing how color, texture, and scale interact on fabric. By embedding correct ICC profiles, soft-proofing with a calibrated monitor, and running small test prints, you establish a reliable baseline for color and opacity. Remember to plan for white underbase where needed and ensure your color channel separations reflect actual material behavior to prevent halos, dull tones, or unexpected shifts across batches.
Color Management for Direct-to-Film Transfers: From Screen to Fabric
Color management is the backbone of reliable DTF transfers. Start by choosing color spaces appropriate for your printer workflow (often CMYK or printer-specific profiles) rather than exporting from RGB. This helps minimize hue shifts, saturation loss, and brightness changes when the artwork translates from screen to fabric. Integrate soft-proofing and monitor calibration into your routine to anticipate how colors will render on various garment colors and textures.
Embed or assign accurate ICC profiles and perform small proof runs to validate color accuracy before committing to a full batch. Incorporate a white underbase where necessary, and ensure your separations reflect how the inks will behave on the chosen fabric. If color management is skipped, you’ll chase discrepancies across orders, leading to inconsistent finishes and wasted materials.
Keeping It Simple: Balancing Detail and Printability in DTF
Overly complex designs are a common DTF print design mistake because very fine lines or micro-gradients can wash out or blur once the transfer is applied. Simplifying patterns, increasing line weights, and avoiding tiny text improves legibility and overall printability on multiple garment colors and textures. This principle aligns with practical DTF print design tips that prioritize clarity and durability over sheer complexity.
When details must remain, test multiple scales and consider reducing gradients or separating color overlays to preserve contrast. Ensure that fine elements have sufficient support from the surrounding shapes and that texture on the garment won’t erode fine lines. By planning for printability early, you reduce the risk of run-and-blur on interpretation across different fabric types.
DPI, Resolution, and Artwork Prep for Robust DTF Prints
Resolution and file preparation directly impact the perceived quality of the direct-to-film transfer. Aim for high-resolution artwork (typically 300–600 DPI for raster images at the final print size) and ensure vectors are properly outlined or rasterized for stable edges. Export formats like PNG or TIFF with minimal compression help preserve detail, while avoiding heavy compression reduces artifacting that can ruin the transfer appearance.
Always preview artwork at 100% size and perform a test print to confirm detail retention before full production. For vector work, ensure clean paths and correct stroke settings to prevent unexpected scaling issues. Align your file prep with DTF design guidelines so every color plate or underbase reads crisply on the final garment, regardless of color or texture.
Bleed, Safe Area, and Alignment in DTF Design for Consistent Results
Bleed and safe-area considerations are essential when designing for DTF, especially across varied garments and press conditions. Include at least a 0.125-inch bleed where imagery meets the edge, and keep critical elements within a safe zone to prevent clipping during cut-and-press processes. Substrate variation across fabrics can cause shifts, so registration marks and calibration tests help ensure alignment across batches.
To minimize misalignment, plan for a robust calibration workflow across different fabric colors and textures. Use standardized test garments, verify alignment, and adjust the design spacing if necessary. These practices support reliable transfer results and reduce the likelihood of misregistered colors or edges in the final product.
Layering, Underbase, and Color Sequencing for DTF Outcomes
Layer order and white underbase decisions are critical to achieving accurate color reproduction on dark and light fabrics. Map out where the white underbase should appear, which colors ride on top, and how light and dark interactions will behave on the chosen substrate. A misordered layer stack can create halos, color bleed, or dull tones that undermine the transfer’s overall quality.
Use a prepress proof to validate layer interactions before printing. For multi-color artwork, test color separations and observe how solid blocks of color interact with the underbase. By validating layering decisions early, you’ll reduce DTF garment printing mistakes and achieve cleaner, more vibrant results that hold up to wash testing and wear.
Frequently Asked Questions
What are the main DTF design pitfalls related to color management and color spaces that can sabotage direct-to-film transfers, and how can you fix them?
A common DTF design pitfall is starting in the wrong color space. Convert artwork from RGB to the printer’s CMYK space early, embed correct ICC profiles, and soft-proof with a calibrated monitor. Include a white underbase when needed, verify color channel separations reflect how ink behaves on fabric, and run a small test print to confirm accuracy before a full batch.
How do overly complex designs contribute to DTF garment printing mistakes, and what DTF print design tips help simplify for better results?
Extremely detailed lines, hairline text, or micro-gradients often blur or vanish after pressing on textured or dark fabrics. Simplify patterns, avoid tiny text, and test multiple scales. If you must include fine details, increase line weight, simplify gradients, and avoid color overlays that kill contrast—this aligns with solid DTF print design tips for legibility and printability.
Why is resolution and DPI critical in DTF transfer troubleshooting, and what steps from DTF transfer troubleshooting help preserve detail?
Artwork saved at too low a resolution will pixelate when enlarged to transfer size. Aim for 300–600 DPI for raster images; for vector art, ensure proper outlining or rasterization at transfer size. Export high-quality PNG/TIFF with minimal compression, preview at 100%, and perform a test print to verify detail before production.
Why are bleed, safe area, and alignment important in DTF design guidelines, and how should you set up files for consistent alignment across fabrics?
Bleed and safe margins prevent important elements from clipping or misaligning during cutting, transfer, or pressing. Include at least 0.125-inch bleed and keep critical elements within a safe area. Add registration marks and run calibration tests across batches to account for substrate variation and ensure consistent alignment on different fabrics.
How should you plan layer order and underbase for dark fabrics to avoid halos in DTF transfers?
DTF transfers rely on correct layering: decide where the white underbase will appear, which colors sit on top, and how light/dark interactions behave on the chosen fabric. Validate layer interactions with a prepress proof to prevent halos, color bleed, or dull tones, especially on dark substrates.
What typography and test-print practices are essential for reliable results in DTF transfer troubleshooting and design guidelines?
Fonts must be licensed and legible at garment size; convert fonts to outlines or rasterize to prevent substitution. Choose bold, clean typefaces and test readability across sizes. Always perform test prints and heat-press calibration to verify font rendering, spacing, and overall print fidelity before full runs.
| Mistake | Key Point | Practical Tip |
|---|---|---|
| 1) Ignoring color management and wrong color spaces | Using the wrong color space (often RGB) and missing ICC profiles can shift hues, saturation, and brightness after separation; may require white underbase and proper color reflections. | Convert artwork to the printer color space early, embed or assign correct ICC profiles, and soft-proof with a calibrated monitor. Include the white underbase when needed and test with small prints to verify color accuracy. |
| 2) Overly complex designs and intricate details | Very fine lines, tiny text, and micro-gradients may blur or disappear on transfer, especially on textured or dark garments. | Simplify patterns, test at multiple scales, increase line weight, and avoid combinations of overlays that reduce contrast; test legibility at garment size. |
| 3) Low resolution or incorrect DPI settings | Artwork that’s too small or low-res will look pixelated when scaled to transfer size. | Aim for 300–600 DPI for raster at final size; outline vectors or rasterize as needed; export high-quality PNG/TIFF and preview at 100% before a full run. |
| 4) Inadequate bleed, safe area, and alignment considerations | Bleed and safe margins prevent edge clipping and misalignment caused by press timing and cutting. | Include at least 0.125-inch bleed, keep essential elements in a safe area, and use registration marks with calibration tests per batch. |
| 5) Layering order and underbase decisions | Incorrect stacking of color layers and neglecting underbase on dark fabrics can cause halos and dull tones. | Plan color sequence and underbase placement; use a prepress proof to validate layer interaction, especially for multi-color artwork. |
| 6) Font choices, licensing, and readability | Decorative or ultra-thin fonts can lose readability; licensing issues can cause legal problems; fonts may substitute if not embedded. | Choose legible fonts, convert to outlines or rasterize, verify licensing, and test readability at garment size. |
| 7) Skipping test prints and press calibration | Without tests and calibration, results can vary across batches in color uptake, texture, and adhesion. | Always run a test transfer on target garment; verify temperature, dwell time, and pressure; maintain a repeatable protocol and adjust as needed. |
Summary
DTF design pitfalls can derail transfers long before the shirt leaves the press. This concise table summarizes seven common mistakes and practical tips to improve prepress, color management, and production workflow. By understanding and addressing these DTF design pitfalls, designers and printers can achieve consistent, vibrant transfers with durable washfastness. Ensure a robust color workflow, validate through test prints, and calibrate presses to translate artwork reliably from screen to fabric. Addressing DTF design pitfalls leads to more reliable results and higher-quality garments.